/link> /link> 2016 | Wise Goblin

Pages

Sunday, December 4, 2016

Building of the Slender Man Miniatures Game Part 3

The day after Thanksgiving, AKA Black Friday, I went over to my friends house so he and another guy named Steve could help me with the terrain.

So I got setup in his garage which has actually been converted over to a workshop for building terrain and buildings for gaming.

Steve showed me how to start dry brushing some colors onto it, to make the rock look more like, well, rock.


He also had me paint the bases of the trees to make them look a little more realistic. They turned out good.


 Here we added a campsite, which is where the bright green flock is. Scott and Steve helped me figure out how to use the most game board with a trail. Great idea!

 The area next to the campsite with the watering hole is where the Indian burial ground is going to be. More on how that works later.
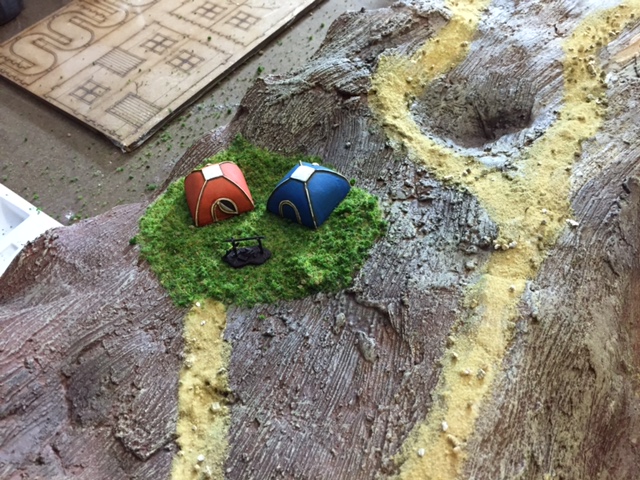
 The campsite.
 Scott shared some of his trees with me so we could just fill out the terrain. We put down clay that could be baked and inserted the trees without their bases.


Unfortunately, when we lifted up the clay, the clay not only tore, but it lifted the paint up in those areas as well. I was a bit frustrated, not mad, but it was going so well. Anyway, I took the whole thing home and let it sit for a week.

Today I repainted where needed, and also added more plaster to where the Jeep will be (not shown). More to come when after I repaint and flock some more. I am going to do some googling to find a really good way to handle the trees. The idea was to just be able to bake the clay, then set the trees back into the hardened clay. This would make it easy for setting up the game board. I may still do this. Not sure yet. I'll update in a week.

Sunday, November 20, 2016

Building of the Slender Man Miniatures Game Part 2

Its been some two years, but after studying safer human and eco friendly methods, I have discovered ways to carry on with my Slender Man game. Also, I now have a proper working space.

I should also preface this with some more background information. Z had helped me build a 2 x 2 gaming board made of plywood and then I made an outline of the terrain on paper and cut up foam and placed it around the board. After this we covered it in fiber glass. The terrain didn't turn out well, and he wanted to do it over. I did not with fiber glass, nasty nasty stuff. That is what I meant when I said a safer and more eco friendly method to build terrain. Z really knows his stuff when it comes to making terrain and gaming components and I appreciate all of his help. I just prefer a way that doesn't involve hard chemicals or no chemicals.


For a while now I have had some Woodland Scenics Plaster Cloth. Three rolls to be exact. I have the jeep. A friend of mine over at Fistful of Seamen bought me two tents at a gaming convention. 
That reminds me of a joke. A guy walks into a bar as says, "I'm a wigwam, I'm a teepee, I'm a wigwam, I'm a teepee!" The bartender replies, "Relax man, your two tents." 
Ok, moving on. 
I have newspaper, styrofoam, tape, and other items, and a strong desire to make this happen!


Ok, after getting the newspaper in place I started the plaster cloth process, dip in water, I was using a clean roller pan liner, which worked perfect for this, and apply.


This stuff is great to work with. I was listening to the Lovecraft eZine podcast while I worked.


You need to layer this stuff.


Ok, with that done, let dry! In the meantime I ordered Woodland Scenics Carving Plaster, flock, rocks, and other terrain coverings, some of which I ordered from Scenic Express. Great company. I got a thick catalog which pretty much had me drooling because there was so many amazing terrain and building peices.


Pictures of items I ordered:


Got the Jeep at a hobby store.


When the carving plaster came in, I applied it and it took the whole gallon to cover just one side. 


Already had the scissors and mixing cup, I got the spray bottle from the dollar store. Also there is the Plaster Mixing Kit and brushes (sold separately). that I had picked up online for this phase.


I have ordered 3 more gallons of carving plaster. That should cover the rest of the plaster cloth. I will keep updating as I make progress.